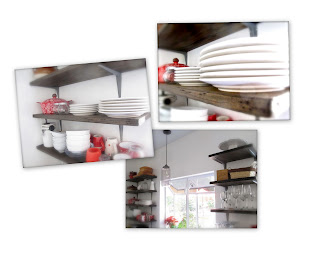
As I've promised previously I'm now writing about my version of salvaged wood shelves. You've seen them everywhere.... in magazines, Pinterest, trendy home design stores... you like the look of the distressed wood but not the high price they ask for these cool shelves... I felt the same way. So after a little research I made my own - needless to say in a fraction of the West Elm price. You don't need experience or fancy tools, everything is basic and simple. So, lets see what I did: First I went to Home Depot and asked them to cut 6 pinewood shelves to the right size. Meanwhile I picked up the wood stain I wanted to use. I want my shelf in old looking, dark brown so I used Minwax stain in dark walnut. I bought brushes, brush cleaners, sandpaper and rag cloth to wipe away the stain. And that's about it - shopping list-wise.
I worked in our garage - you will need a big working table and a well ventillated space . First, use sandpaper or sanding machine on every side of the wood to make it clean and smooth... Then the fun part begins when we distress the wood. If you check out old wood shelves the first thing you might notice is that there are no sharp edges. What the time did to the wood we do this with hammer: hit the edges, make them round and uneven... After that use nails, fork, sharp knife... whatever you find around you to make the wood "worn out". You can not make a mistake - hit, scratch the surface... have fun but don't overdo it and try not to make patterns - which can give the unwanted fake look to the wood. When you finished, wipe the surface - make sure it is clean. Read the instruction of the stain. Cover your table (you might use four posts to elevate your wood for easier painting). With your brush paint one side of the shelf - then you must wait a certain amount of time (depends of how dark you want the color be) then use the rag cloth and wipe the stain away. But be careful (I messed up it first time) - always wipe in one direction!
I only used one coat of stain. I let one side completely dry before i moved to the next side. The stain play up the wood scraches nicely - look so cool!:)
You can use any kind of shelf bracket - modern, country, vintage... I choose the simpliest Home Depot kind because I wanted an industrial look - and I'm very happy with the result!:) I hope that you like it too - let me know if you have any questions!
Hi Friends,
I hope that you all had a wonderful Summer - and are now ready for the
cooler seasons!
I haven't posted for a while - not because I neglected my blog but
because of the move to our new home and our annual visit to Hungary.
Needless to say the last few months were extremely stressful - but our
new home is almost done - except my studio - which I'm doing right now.
(Even tough I'm still suffering from the nine hour time difference:))
Because I had to put my work on hold for months I need to catch up on it
ASAP.
I haven't forgot that I promised to write about my "salvage wood shelf"
project - and I will post pictures of our new house for those who are
interested.
New jewelry and home decor collections are coming soon! I can't wait to
start to work in my new studio!:) Please stay tuned - I'm happy to share
the progress with you.:)
Sziasztok!
Remelem mindannyiotoknak vidaman teltek a nyari honapok es sok jo elmennyel feltoltodve varjatok a huvosebb honapokat!:)
Ugy tunhet, hogy elhanyagoltam a blogot - ennek oka a (nem tul egyszeru) koltozesunk, uj haz felujitas es a nyari "hazalatogatasunk". Honapokig nem tudtam dolgozni - ami mar rettenetesen hianyzik! Az uj otthonunk majdnem kesz - kiveve a muhelyem. Tegnap jottem vissza Magyarorszagrol, ma mar a muhelyt pakolom, igyekszem, hogy minel hamarabb beuzemelhessem! Nem felejtettem el, hogy igertem irok a hazi keszitesu "antikolt" polcomrol is, s fotok is lesznek az uj hazrol - azoknak, akiket erdekel.
Uj ekszer es dekoracois kollekciokat is mutatok hamarosan - ugyhogy ne menjetek messzire!:)
Addig is szep napokat Nektek!:) XO


